
Create Your Own Sweet Surprise with This Fun Popup Card Tutorial
- Aug 5, 2025
- 3 min read
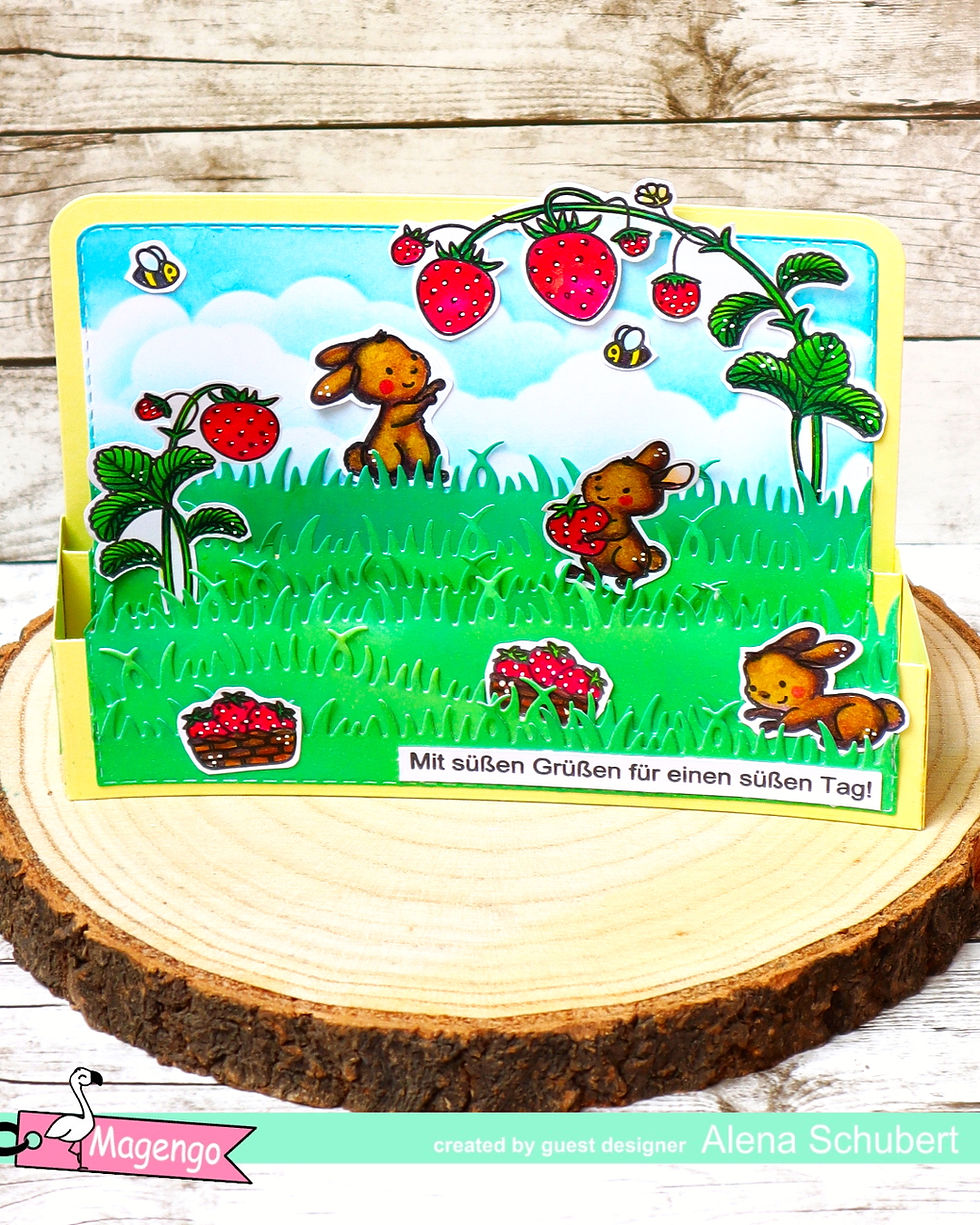
Hello everyone! Today, I’m excited to share a delightful project that’s sure to bring a smile to anyone’s face. We’re going to create a charming popup card using the Berry Sweet Moments stamp set, the Grass Borders Die Set, and the Fluffy Cloud Stencil. This card is perfect for any occasion—whether it's a birthday, a thank you note, or just because! So, gather your crafting supplies, and let’s get started on this fun creative journey!
Materials You'll Need
Before we dive into the step-by-step process, here’s a detailed list of materials you’ll need to gather:
Berry Sweet Moments Stamp Set
Grass Borders Die Set
Fluffy Cloud Stencil
Cardstock in various colors
Ink pads in your favorite shades
Scissors
Adhesive (glue or double-sided tape)
A scoring tool
Optional: Markers or colored pencils for added decoration
With everything gathered, you’re all set to bring this sweet surprise to life!
Step 1: Cutting the Card Base
Start by choosing a sturdy cardstock for your card base. A good size to work with is 5x7 inches, which gives you plenty of room for your popup elements.
Using your scoring tool, score the cardstock down the center at 3.5 inches. This will help you fold the card neatly in half, creating a crisp edge. After scoring, fold along the line to form your base.
Step 2: Designing the Popup Mechanism
Now it’s time to create the popup mechanism. Take a piece of cardstock and cut it into a strip measuring 2x5 inches. This will serve as the support structure for your popup elements.
Next, score the strip at 2 inches and 4 inches to create flaps. Fold the flaps in opposite directions to create a ‘V’ shape that will stand up when the card is opened.
To attach the popup, use your adhesive to stick the bottom of the ‘V’ to the center of your card base. Make sure it’s secure!
Step 3: Stamping the Images
Using the Berry Sweet Moments stamp set, choose your favorite fruit images and stamp them onto a separate piece of cardstock.
Step 4: Cutting Out the Stamped Images
After coloring and drying your stamped images, it’s time to cut them out. Be sure to leave a small border around each fruit for a polished finish.
Once cut, adhere them to the popup mechanism. Attach them to the top flap of the ‘V’ structure, letting them peek out when the card is opened.
Step 5: Creating the Grass Border
Next, take your Grass Borders Die Set and cut a beautiful grassy border from green cardstock. This will introduce a lovely layer to your card design.
Once cut, adhere the grass along the bottom of your card base. This provides a natural setting for your popup fruits. Did you know that a vibrant, grassy scene can visually uplift a card? It engages the recipient and draws them into your sweet creation!
Step 6: Adding the Fluffy Clouds
It’s time to bring the sky into your design! Utilizing the Fluffy Cloud Stencil, lightly ink the top portion of your card base to create fluffy clouds against a bright blue sky.
Feel free to experiment with colors! Blend light blues and whites to create a soft background. The clouds will beautifully contrast with your popup elements, making them stand out even more.
Step 7: Personalizing Your Card
Now that the main elements are set, let’s add a personal touch. Include a heartfelt message inside your card or on its back.
Consider writing something like, “You’re Berry Special!” or “Thank You for Being You!” Using your markers, write it in a cheerful, fun font. This simple addition will elevate your card’s charm and make it unique.
Step 8: Final Touches
Finally, take a step back and evaluate your card. Does everything look just right? You can always add a few extra embellishments like tiny butterflies or sparkling gems for a touch of whimsy.
Ensure that the flap folds down correctly and that there is ample space for the images to stand tall when the card is opened. This attention to detail guarantees a delightful surprise!
Wrapping It Up
Congratulations! You’ve created a sweet popup card that’s bursting with personality and charm. This project is a wonderful way to brighten someone's day.
With just a few materials, you can craft something meaningful. Don’t hesitate to customize your designs and color schemes—crafting is all about personal expression. Share your creations with friends and family, and watch as they admire your skills!
Happy crafting, and remember: Every card you make carries the sweetness of your creativity!
See you next time!
Alena Christin


Comments